|
Vooraf
De verlichtingsterkte in Lux (illuminance) en de lichtsterkte of luminantie in Cd/m2
(luminance) kunnen direct met fotometrische toestellen gemeten worden.
Er dient vermeld te worden dat fouten op meettoestellen van meer dan 10 % niet uitzonderlijk
zijn. Daarom is het gebruik van regelmatig geijkte meetapparatuur een basis vereiste.
Metingen zijn ook steeds zeer gevoelig aan omgevingsinvloeden. Correcte metingen dienen
door bevoegd personeel uitgevoerd en geïnterpreteerd te worden.
Even wat licht theorie:
Met hartelijke dank aan Johan G. Smits van www.Lichtconsult.nl voor de theoretische backup
Verlichtingssterkte in lux (illuminance)
|
De verlichtingssterkte van een bepaald oppervlak komt overeen met het aantal lumen
dat erop invalt per m2.
Eenheid: lux = lumen per m2 [lx]
Voorbeelden:
- zomers buiten in de middagzon circa 100.000 lx
- kantoorwerk: gemiddeld 400 lx
- openbare verlichting op drukke punten : ca. 30lx
- openbare verlichting op rustige punten : ca. 10lx
Deze waarde kan gemeten worden met een verlichtingsterkte meter ("lux meter").
|
Lichtstroom in lumen (luminous flux)

|
De lichtstroom is de totale hoeveelheid licht die een lichtbron per seconde
in alle golflengten van het zichtbare licht uitzend.
Eenheid: lumen [lm]
Voorbeelden:
- gloeilamp van 100 W geeft circa 1000 lm
- een kaars geeft circa 10 lm
|
Lichtsterkte in candela (luminous intensity)
|
De lichtstroom is de totale hoeveelheid licht die een lichtbron per seconde
in alle golflengten van het zichtbare licht uitzend. De lichtsterkte van een
lichtbron is de lichtstroom die per eenheid van ruimtehoek in een bepaalde richting
wordt uitgezonden.
Eenheid: candela = lumen per sterradiaal [cd]
1 sterradiaal = oppervlak van 1x1m in een bol met straal 1m,
waarbij de hoekpunten met het middelpunt van de bol zijn verbonden.
Voorbeelden:
- autokoplamp circa 15.000 cd
- gloeilamp van 100 W circa 80 cd in elke richting
|
Lichtsterkte
|
De lichtsterkte van een verlichtingstoestel bepalen kan door het meten van de
verlichtingssterkte(lux) in in een vlak loodrecht op de meetrichting en door
het gebruik van de volgende formules:
E=I/d2 en I=E.d2
waar,
E = verlichtingssterkte in het vlak loodrecht op de meetrichting in Lux,
I = de lichtsterkte in de meetrichting, in candela's,
d = de afstand van het meetpunt tot de lichtbron in meter
Bijgevolg, de verlichtingsterkte(Lux) van een lamp neemt af met het kwadraat van de afstand.
Bv een lamp van 400 Lux geeft op 1 meter afstand 400 Lux, op 2 meter afstand 100 Lux en op 4m sfstand nog maar 25 Lux.
Dus:
Meten we het aantal Lux met een Luxmeter op een afstand van 1 meter, dan is het
aantal gemeten Lux gelijk aan de lichtsterkte in Cd (Candela) of te wel in goed engels Cp, Candelepower.
|
Praktijk !
Nu we de theorie kennen, kunnen we overgaan naar de praktijk.
De idee is dus simpel: meet met een Lux meter het aantal Lux op een afstand van één
meter tot onze lamp.
Echter de opnemer van een Luxmeter is bedoeld om al het invallend licht, uit alle
richtingen, te meten, terwijl wij alleen geïnteresseerd zijn in de richting loodrecht op onze bron.
We moeten dus een constructie bedenken die al het overige licht absorbeert.
Uitgaande van een sensorgrootte van 45mm in diameter, zou een buis van 50mm en een
lengte van bijna een meter het beste aan ons doel beantwoorden. Echter, in de praktijk
blijkt dat bijna alle materialen een zekere lichtreflectie (Luminantie) hebben en meten
we dus door zijdelingse reflektie in de buis, meer licht.....
Ook is een buis met een lengte van bijna een meter niet echt hanteerbaar.
Zonder gebruik te gaan maken van allerlei exotische materialen moeten we dus een
constructie maken waarbij we de inwendige reflekties blokkeren en tegelijk een virtuele
buis creëren waardoor we meten.
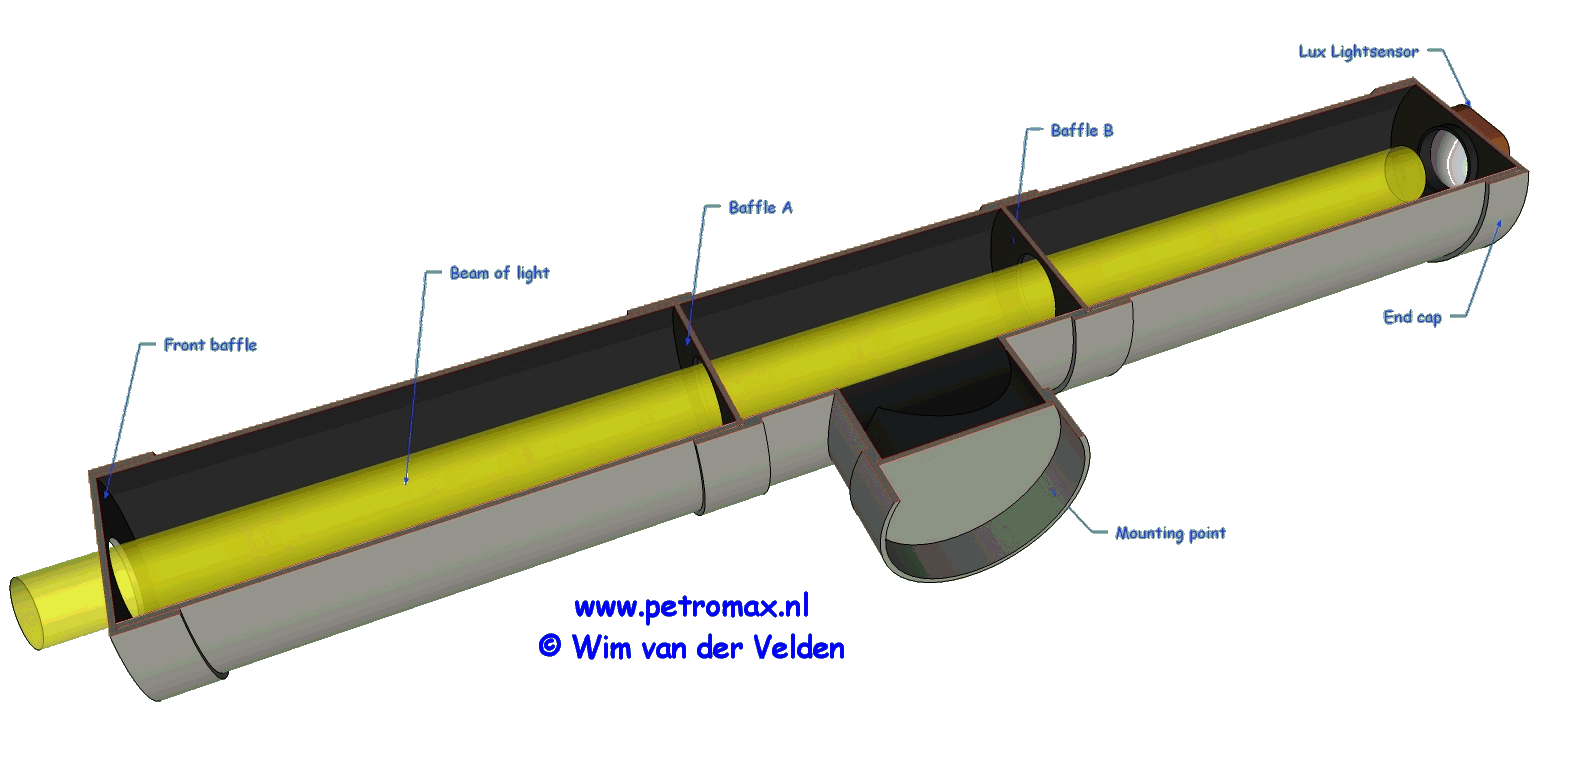
één en ander komt er dan zo uit te zien of kan er zo uit komen te zien:
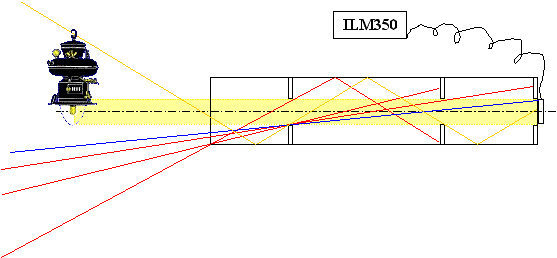
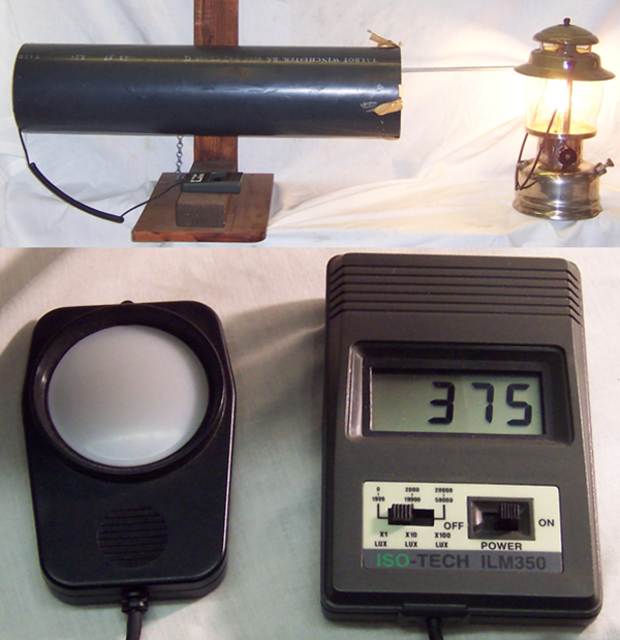 Deze lichtmeter is gebouwd door "The International Guild of Lamp Researchers" en is één
van en set van drie stuks en is opgebouwd om de ISOTECH ILM350 Luxmeter. Origineel ontwerp is van Neil McRae en Fil Graff
Een ander idee is dit ontwerp gebaseerd op PVC pijp en onderdelen :
Deze lichtmeter is gebouwd door "The International Guild of Lamp Researchers" en is één
van en set van drie stuks en is opgebouwd om de ISOTECH ILM350 Luxmeter. Origineel ontwerp is van Neil McRae en Fil Graff
Een ander idee is dit ontwerp gebaseerd op PVC pijp en onderdelen :
|
Meten is weten
|
Om te kunnen vergelijken moeten alle metingen onder dezelfde parameters uitgevoerd
worden:
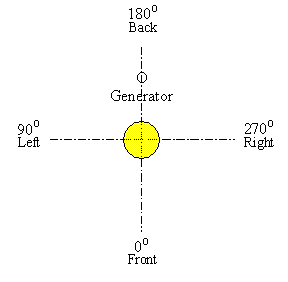
- min. 4 metingen uit vier haaks op elkaar staande richtingen, zie tek.
- bij druklampen een druk van 2bar in de tank,
- minimale opwarmtijd van 30 minuten in acht nemen,
- Bijzonderheden noteren, bv. een ingebouwde reflector, twee gloeikousen ipv één.
Als we meten zullen we bij druklampen al gauw een fluctuatie zien. Het lijkt als of
de lamp knippert. Bepaal dan via de hoogste, laagste en gemiddelde waarde.
Dit klinkt formeel, maar als we de resultaten willen vergelijken dan moeten we wel
dezelfde uitgangssituaties hanteren.
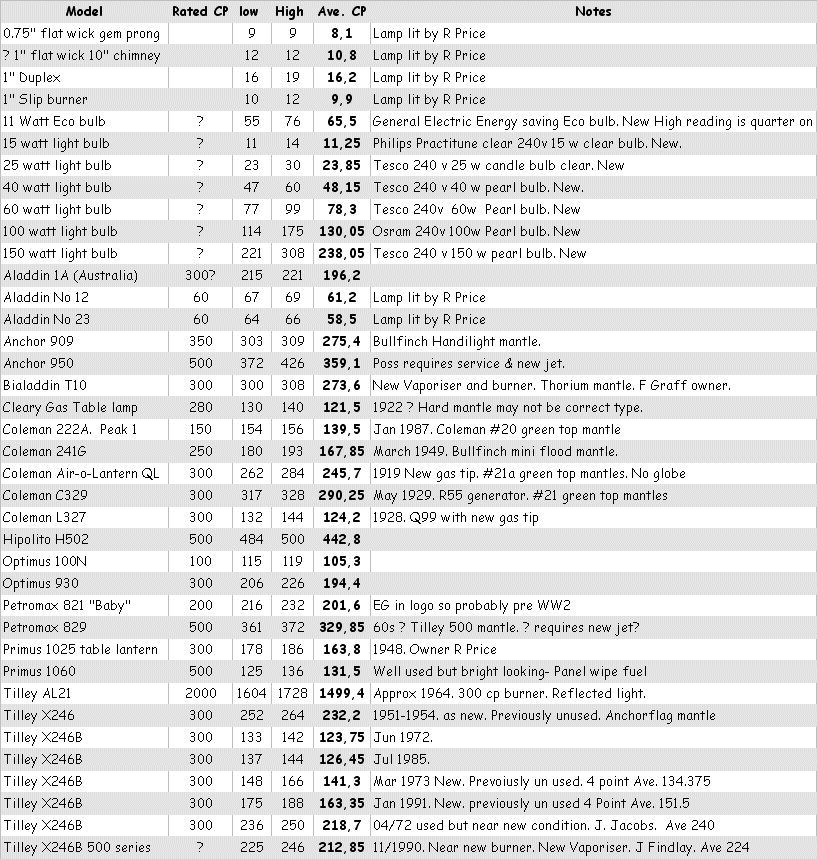
De onderstaande tabel is het resultaat van meerdere metingen, in verschillende richtingen
van een aantal bekende lampen.
|
Resultaten
|
`It is nothing that meets the mark 1 eyebal.`
Neil McRae, one of the three
Deze uitspraak van Neil McRae, die één van de drie identieke lichtmeters bezit,
kunnen we vertalen met: het lijkt er totaal niet op.....
Inderdaad zijn de resultaten niet in overeenstemming met wat men verwacht aan de
hand van wat je met het blote oog ziet.
Voor de gehele tabel en alle afzonderlijke waarden geld een copyright !
Rated CP is de waarde die de fabrikant opgeeft. We missen, voor de overdruklampen,
eigenlijk nog een kolom met de overdruk. Bovenstaande waarden gelden voor de, door
de fabrikant opgegeven, minimale bedrijfsdruk.
Voor Tilley is dit 30psi,
voor petromax (klonen) is dat 2 bar.
NAAR BOVEN
|
Lightmeasurement
|
In advance
The luminance in lux and the brightness or luminance in cd/m2 (luminance) can be directly measured with photometric devices.
It should be noted that errors in measuring devices of more than 10% are not uncommon. Therefore, the use of regularly calibrated measuring apparatus is a basic requirement.
Measurements are also very sensitive to environmental influences.
Some light theory:
With a big "Thank You" to Johan G. Smits, from www.Lichtconsult.nl, for the theoretical backup.
Luminance in lux
|
The illumination intensity of a specific surface area corresponds to the number of lumens that it receives per m2.
Unit: lux = lumens per m2 [lx]
Examples:
- Summer outside in the afternoon about 100,000 lx
- Office: average 400 lx
- Public lighting at busy points : approximately 30lx
- Public lighting in a quiet street : approximately 10lx
This value can be measured with a "Lux meter".
|
Luminous flux in lumens
|
The luminous flux is the total amount of light that a light source transmits per second in all the wavelengths of the visible light.
Unit: lumen [lm]
Examples:
- 100 W incandescent bulb gives approximately 1000 lm
- A candle gives approximately 10 lm
|
Luminous intensity in candela
|
|
The luminous flux is the total amount of light that a light source "transmits" per second in all the wavelengths of the visible light.
The light intensity of a light source, is the luminous flux per unit of an angle transmitted in a certain direction.
Unit: lumen = candela per star radial [cd]
1 star = radial surface of 1x1m in a sphere with a 1m radius,
wherein the vertices of the sphere are connected with the center of it.
Examples:
- Car headlight approximately 15,000 CD
- 100 W incandescent bulb about 80 CDs in each direction
|
Illumination
|
The light intensity of a lighting device can be determined by measuring the luminance (lux) in a plane perpendicular
to the direction of measurement and by the use of the following formulas:
E=I/d2 en I=E.d2
where,
E = illumination in the plane perpendicular to the direction of measurement in Lux,
I = the light intensity in the measuring direction, in candelas
d = the distance from the measuring point from the light source in the meter
Accordingly, the luminance (lux) of light decreases with the square of the distance.
E.g. a lamp of 400 Lux at 1 meter gives 400 Lux, 100 Lux at 2 m distance and 25 lux at 4 m.
So:
If we measure the amount of Lux with Lux meter at a distance of 1 meter, the measured Lux equals the light intensity
in Cd (Candela) or in good old English Cp, Candlepower.
|
Hands on !
|
Now we know the theory, we can move on to the practice.
The idea is simple : measure with a Lux meter the amount of Lux at a distance of one meter to our lantern.
But the sensor of a Lux meter is intended to measure ALL the incoming light, from all directions, while we only are interested in the direction perpendicular to our source.
We must therefore design a structure that absorbs or cuts off all other (reflected) light.
Assuming a sensor size of 45mm in diameter: Ideally A 50mm Dia tube with a length of almost one meter is required.
However, in practice, it appears that almost all materials have a degree of light reflection (luminance), and
therefore, because the sensor will not only see the light source it will also see the lateral reflections from the
inner surface of the tube, we measure more light than there actually is .....
Also a tube having a length of almost one meter is not easy to handle.
Without the use of exotic materials we have to create a structure which blocks the reflections while creating a
virtual non reflective pipe through which we measure.
It will look like this in the following picture:
This light meter set is one of three created by "The International Guild of Lamp Researchers" and is constructed
around the Isotech ILM350 Lux meter. Original design is from Neil Mcrae and Fil Graff
An other idea is to use PVC pipes:
|
To measure is to know.
|
|
In order to be able to compare measurements taken at different times and with different apparatus we need a
standard method of measurement. :
- At least 4 measurements in perpendicular directions, see fig.
- Pressure lamps should be operated with a pressure of 2bar in the tank. This is critical and the pressure needs to be as near to 2bar as possible.
- Minimum heating time of 30 minutes before measuring to get a stable light output,
- Special notes, like a built-in reflector, two mantles, variations in pressure Etc.
When measuring pressure lamps there is considerable fluctuation in the readings. It seems as if the light blinks or flickers. The best way to deal with this is
to measure the highest, lowest and record an average value.
This all sounds formal, but if we want comparable results then we must use the same parameters.
The table below gives the results of several measurements, in different directions of a number of known lamps.
|
Resultaten
|
`You cannot measure light with the mark 1 eyeball.`
Neil McRae, one of the three designers of this photometer
This statement by Neil McRae, who owns one of the three identical photometers, we can translate as :
"what we see is not the truth because the Mark I eyeball is not a calibrated instrument".....
Indeed, the results are not consistent with what one expects on the basis of what you think you see with the naked eye.
The entire table and all individual values are copyrighted !
Rated CP is the value specified by the manufacturer. We have not included a column recording the pressure for
pressure lamps,. All readings are taken at the manufacturer-specified optimum operating pressure.
For Tilley that is 30psi,
for Petromax (and clones) that is 2 bar.
Generally for other makes the pressure is also 2 bar but there may be exceptions in some early products that are
designed to work at under 2 bar and if there is any variation then that should be recorded in the notes
|
- Up -
Lichtmessung
Sorry, dauert noch eine kleine Weile.
Top
| |